expr:class='data:blog.pageType'>

Saturday, July 8, 2017

DJI MAVIC PRO

by on July 08, 2017
THE DJI MAVIC PRO


10 Steps For Getting Started With The DJI Mavic Pro


We’ve had the Mavic Pro for a few weeks now and it’s been really easy to use from day one. but that might not be the case if you’ve never owned a drone before. Compared to all of the other drones out there. the Mavic Pro is one of the easiest drones to use but for a beginner. any drone is going to take some learning and practice before you take it on adventures with you.DJI MAVIC PRO


This post is an evolving quick start guide. created based on my experience with the Mavic Pro and all the other drones that I’ve used in the past.
If you have more specific questions about the Mavic Pro. go to out FAQ page.
STEP 1
Take everything out of the box and inspect it to make sure there’s nothing missing or broken. You shouldn’t expect any issues. but with mass market products you never know. You can also (carefully) remove the gimbal dome and gimbal clamp so it can move around freely when powered on.
STEP 2
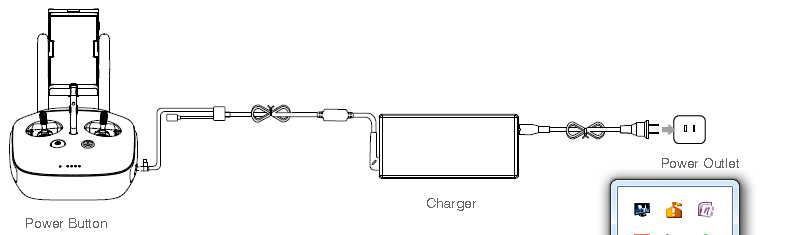
Charge both the Mavic Pro battery and the controller. The Mavic battery plugs into the power supply (the charge plug is reversible) and will start charging automatically. When the Mavic battery is done charging. the lights on the battery will turn off. To charge the controller. plug a micro USB cable into the left side of the controller and plug the other end into the Mavic power supply. You can also charge your smartphone using the extra USB port on the power supply.
STEP 3
Connect your phone to the controller. There should be a micro USB cable for Android and a Lightning cable for IOS. Install whatever cable you need before mounting your smartphone. After that. unfold the Mavic Pro controller and connect it to your smartphone. For the best fit. you can also take your phone out of the case.
STEP 4
Install and launch the DJI GO app. There are a few ways of getting the app. but the easiest is to just go to the App store or Google Play store and search “DJI GO”. Once the app is installed. open it and create a DJI account.
STEP 5
Download and Instal the latest Mavic Pro firmware (if necessary). To update the Mavic Pro and the controller. make sure your phone is connected to the controller with a cable and has an internet connection as well. Then power on the Mavic Pro and the controller. Both devices turn on by pressing the power button once. then pressing again and holding it down. On the Mavic. the lights will show a powering up sequence. On the controller you will hear a power up sound.DJI MAVIC PRO
After a few seconds. you should see a picture of the Mavic Pro on the DJI GO app. If there is an update. it will appear as a blue bar at the top of the screen showing the version number. If you don’t see an update. try restarting the DJI GO app. Once you see the update. press download and then install once it’s done downloading. While the firmware is being installed. don’t turn off your phone. the Mavic Pro. or the controller. You may see the Mavic and controller restarting once or even multiple times during the update. This is normal.
After everything is done. the app should say. “update successful”. At this point. you can turn everything off or keep moving forward.
STEP 6
Mount the propellers. There are two kinds of propellers that come with the Mavic. If you look closely at the base of each propeller. you will see that some have a white ring on them and some don’t. Looking at the Mavic. you will also see white rings on two of the motors. These white rings signify that the motor/propeller rotates counter clockwise. Match the rings on the propellers with the rings on the motors.
To mount the propellers. align the notches on the propeller mounts with the holes on the motors. then push down and rotate to lock them into place.
STEP 7
Get ready for takeoff by calibrating the compass. The compass is what tells the drone what direction it’s facing. so you need to calibrate it every time you move to a new location (Like going from your house to the nearest mountain for example). If the compass needs calibrating the app should tell you automatically. but it’s better to calibrate it often to insure that the Mavic is flying as good as it can.
To calibrate the compass. first make sure that the Mavic Pro is unfolded. otherwise the motors can cause compass interference. Then turn on the Mavic and controller. connect your phone. launch the DJI GO app and tap on the blue camera button. You should see a live video feed. This is where you will find all of the settings for the Mavic and control the camera.
Tap on the colored bar at the top of the screen and now you should be in the aircraft status page. In the section called compass. tap the calibrate button. At this point it should ask you to rotate the drone 360 degrees horizontally and the light on the back of the Mavic should be yellow.  Once you turn the Mavic 360 degrees horizontally. the light will turn green and It will ask you to do the same thing vertically. This means you need to turn the drone on its side and rotate it another 360 degrees. While rotating vertically the head of the drone can be facing to the left. right or facing down. It doesn’t matter as long as it’s sideways. but it’s easiest with the head facing down.
If you don’t want to use the app to calibrate the compass. you can also do it by just pushing the sport mode switch up and down 3 to 5 times and the calibration sequence will start right up.
Below you will see my video example of how I do it. The DJI app says to do it a bit differently. but this way is the fastest and produces good calibration results.
STEP 8
Start flying! Honestly flying the Mavic Pro is one of the easy steps. Before flying. for your first flight it’s best to make sure you are outside with at least 10 feet of space around you in every direction. You should also wait until the Mavic has established a home point (the place where it will land if you tell it to go home. if the battery is too low. or if it loses signal). To check the home point. just look at the map in the app. If you see a green “H” symbol and it appears in the same place as the blue dot (you) and the red arrow (the drone) then you’re ready for takeoff!
To takeoff. tap on the takeoff button and slide your finger to launch the drone. or push both controller sticks to their lower corner positions until the motors start. Once the Mavic is in the air. it will hover at about 5 feet from the ground.
At this point you can start getting a feel for the controls. On the left stick. pushing it up and down will make the Mavic fly up and down. Pushing it left and right will make it rotate left and right. On the right stick. pushing the stick forward and backward makes the Mavic fly forward and backward. Pushing it left and right will make the Mavic fly left and right. Finally. to land the Mavic Pro just fly down until the drone stops and it asks if you want to land. If you slide your finger it will land. otherwise keep holding the left control stick down until it lands and the motors turn off. Here’s a video on how to fly the Mavic Pro. so you can get a better idea of the controls.
STEP 9
Start using the camera. If you look at the app. there should be a red or white button on the right side of the screen. Red means record video and white means take photos. Below that you will see a settings icon. This is where all of the camera settings are located. To focus the camera. you just tap on where you want the focus to be. It’s just like using a smartphone camera. If you don’t know what to focus on. tap on whatever is the farthest away in the scene. like a mountain in the distance. If you focus to infinity (by tapping on something farther than a few feet away) everything should be sharp until you get to about 15 feet or less.
There should already be an SD card inside the Mavic Pro so you can start recording right away. To tilt the camera up and down. there is a wheel on the back left side of the Mavic which controls the gimbal. The last thing you should know is that the dome cover (the plastic bubble thing) is not intended for use while in flight. It’s only for protecting the camera when transporting the Mavic. so leave it off for the best image quality.DJI MAVIC PRO
STEP 10
Have fun and explore. but be careful. I only talked about what you need to know to fly the Mavic Pro and take video. but there’s much more to this drone than that. There’s tons of camera settings. flight settings and automated flight modes to try out. but take things slow. The biggest reason why drones crash is not because of the drone itself. but because the operator was too impatient. You have all the time in the world to explore the features of the Mavic. but you won’t have any time if you crash it on the first day. so just focus on flying manually for the first few flights and try new things as you get more familiar with everything.

Tuesday, July 4, 2017

DJI Phantom 3

by on July 04, 2017
Setting  DJI Phantom 3


 phantom 3

 phantom 3

 phantom 3

Rc quadcopter phantom 3

Remote Controller Profile
The Phantom 3 Advanced remote controller is a multi-function wireless communication device that integrates the video downlink system and aircraft remote control system. The video downlink and aircraft remote control system operate at 2.4 GHz. The remote controller features a number of camera control functions, such as taking and previewing photos and videos, as well as controlling gimbal motion. The remote controller is powered by a 2S rechargeable battery.DJI Phantom 3

 The battery level is displayed via LED indicators on the front panel of the remote controller.
Refferences:


Compliance Version: The remote controller is compliant with both CE and FCC regulations.
Operating Mode: Control can be set to Mode 1 or Mode 2, or to a custom mode.

Mode 1: The right stick serves as the throttle.
Mode 2: The left stick serves as the throttle.
Note: To prevent transmission interference, do not operate more than three aircrafts.
Using the Remote Controller
Turning the Remote Controller On and Off
The Phantom 3 Advanced remote controller is powered by a 2S rechargeable battery that has a capacity of 6000 mAh. The battery level is indicated via the Battery Level LEDs on the front panel. Follow the steps below to turn on your remote controller:
1. When the remote controller is turned off, press the Power Button once. The Battery Level LEDs will display the current battery level.
2. Press and hold the Power Button to turn on the remote controller.
3. The remote controller will beep when it is turned on. The Status LED will rapidly blink green, indicating that the remote controller is linking to the aircraft. The Status LEDs will glow solid green when linking is complete.DJI Phantom 3
4. Repeat Step 2 to turn off the remote controller.
Turning the remote controller on and off.
Charging the Remote Controller
Charge the remote controller using the included charger. Refer to the figure on next page below for more details.
Charging the remote controller.
Controlling the Camera
Shoot videos/pictures, view recorded images, and adjust camera settings via the Shutter Button, Camera Settings Dial, Playback Button, and Video Recording Button on the remote controller
Controlling the camera.
[1] Camera Settings Dial
Turn the dial to adjust camera settings such as ISO, shutter speed, and aperture without letting go of the remote controller. Move the dial to left or right to scroll through pictures and videos in playback mode. Press down on the dial to toggle between these settings.
[2] Playback Button
Press to view images and videos that have already been captured.
[3] Shutter Button Press to take a photo. If burst mode is activated, multiple photos will be taken with a single press.
[4] Video Recoding Button
Press once to start recording video, then press again to stop recording.
[5] Gimbal Dial
Use this dial to control the tilt of the gimbal.
Controlling Aircraft
This section explains how to control the orientation of the aircraft through the remote controller. The Remote Control is set to Mode 2 by default.
Refference:
Stick Neutral/Mid-Point: Control sticks are in the center position. Moving the Control Stick: The control stick is pushed away from the center position.
Gimbal and dial3.

Flight Mode Switch
Toggle the switch to select the desired flight mode.You may choose between; P-mode, F-mode and Amode.
Flight mode switch1.png Flight mode switch2

P-mode (Positioning): P-mode works best when the GPS signal is strong. There are three different versions of P-mode, which will be automatically selected by the Phantom 3 Advanced depending on GPS signal strength and the Vision Positioning sensors:
P-GPS: GPS and Vision Positioning both are available; the aircraft is using GPS for positioning.
P-OPTI: Vision Positioning is available but a sufficient GPS signal is not available. Aircraft is using only Vision Positioning for position holding.
P-ATTI: Neither GPS nor Vision Positioning is available, the aircraft is using only its barometer for positioning, so only altitude is maintained.
A-mode (Attitude): GPS and Vision Positioning System are not used for stabilization. The aircraft uses only its barometer to stabilize. The aircraft can automatically return to the Home Point if remote controller signal is lost and the Home Point was recorded successfully.
F-mode (Function): Intelligent Orientation Control (IOC) is activated in this mode. For more information about IOC, refer to the IOC section in the Appendix.
By default, the Flight Mode Switch is locked to P-mode. To unlock other flight modes, launch the DJI Pilot app, enter the “Camera” page, and tap “Mode”, then activate “Multiple Flight Mode”.
RTH Button
Press and hold the RTH button to start the Return-to-Home (RTH) procedure. The LED ring around the RTH Button will blink white to indicate that the aircraft is entering RTH mode. The aircraft will then return to the last recorded Home Point. Press this button again to cancel the RTH procedure and regain control of the aircraft.
RTH button.

Connecting Your Mobile Device
Tilt the mobile device holder to the desired position. Press the button on the side of the mobile device holder to release the clamp, and then place your mobile device into the cradle. Adjust the clamp down to secure the mobile device. To connect your mobile device to the remote controller using a USB cable, plug one end of the cable into your mobile device and the other end into the USB port on the back of the remote controller.
Connecting your mobile device.


Optimal Transmission Range
The transmission signal between the aircraft and the remote controller is most reliable within the area that is depicted in the image below:
Optimal transmission range.


Ensure that the aircraft is flying within the optimal transmission zone. To achieve the best transmission performance, maintain the appropriate relationship between the operator and the aircraft.
Remote Controller Status LED
The Status LED reflects the strength of the connection between the remote controller and the aircraft. The RTH LED indicates the Return-to-Home status of the aircraft. The table below contains more information about these indicators.
Remote LED.

Status Led

Linking the Remote Controller
The remote controller is linked to your aircraft before delivery. Linking is only required when using a new remote controller for the first time. Follow these steps to link a new remote controller: 1. Turn on the remote controller and connect to the mobile device. Launch the DJI Pilot app.
2. Turn on the Intelligent Flight Battery.
3. Enter “Camera” and tap on Icon.png and then tap “Linking RC” button as shown below.
RC Control Setting.png
4. The remote controller is ready to link. The Remote Controller Status Indicator blinks blue and a beep is emitted.
RC Control Setting2.


5. Locate the linking button on the side of the aircraft, as shown in the figure below. Press the link button to start linking. The Remote Controller Status Indicator LED will display a solid green once the remote controller is successfully linked to the aircraft.DJI Phantom 3
RC Control Setting3.


Note:
The remote controller will un-link itself from an aircraft if a new remote controller is linked to the same aircraft.
Remote Controller Compliance Version
The remote controller is compliant with both CE and FCC requirements.

DJI Inspire Setting Up Dual Remote Controllers Mode

by on July 04, 2017

DJI Inspire Setting Up Dual Remote Controllers Mode


Remot Control DJI Setting

Dual Remote Controllers mode is disabled by default. Users must enable this feature on the “Master” 

remote controller by through the DJI Pilot app. Follow the steps below for setup:
“Master” Remote Controller:
1. Connect the remote controller to your mobile device and launch the DJI Pilot app.
2. Go to the Camera page, and tap to enter the remote controller settings window.
3. Tap “Set RC Status” to enable Master-and-Slave mode.
4. Select “Master” in the “Set RC Status” section to set the remote controller as “Master” remote 
controller.
5. Enter the connection password for the “Slave” remote controller.DJI Inspire Setting Up Dual Remote Controllers Mode
Dual remote controller2.

“Slave” Remote Controller:
1. Tap “Search for Master Controller” to search the “Master” remote controller.
Dual remote controller3.


Note:
Remote controller cannot link to the aircraft if the remote controller is set as “Slave”. Meanwhile, the 

“Slave”remote controller cannot control the orientation of the aircraft. Reset the remote controller to 

“Master” in DJI Pilot app if you wish to link the remote controller to the aircraft.RC DJI INSPIRE Setting
2. Search the “Master” remote controller in the surrounding area in the “Request Control” section.
Dual remote controller4.DJI Inspire Setting Up Dual Remote Controllers Mode


3. Select the “Master” remote controller from the “Master RC List” and input the connection password 

to connect to the desired “Master” remote controller.DJI Inspire Setting Up Dual Remote Controllers Mode
Dual remote controller5.